- 1 课程回顾
- 2 概述
- 3 通过ox-publish写博客
- 4 通过 ox-hugo 来写博客
- 4.1 安装配置ox-hugo
- 4.2 如何通过 ox-hugo 导出为博客
- 5 结语
1 课程回顾 🔗
我们通过上节课,学习了如何将org文件导出为HTML、Markdown、PDF、Docx、PPT、Reveal.js幻灯片等,有了这个强大的功能,我们就可以在Emacs里通过Org mode来写各种类型的文档了,你不需要关心格式,只需要专注在内容,这是非常棒的一点!
今天,我们来学习如何通过Org mode来写博客。
2 概述 🔗
通过Org mode来写博客,其核心还是org文件本身,我们利用Org mode强大的markup的能力,以及它能导出为各种格式文件的机制,就可以使用Org mode来写博客啦。
在Emacs里通过Org mode写博客也有很多方式,这里,我着重介绍以下两种方式:
- 通过Org mode自带的
ox-publish机制导出为静态HTML站点 - 通过
ox-hugo插件,利用hugo的强大功能导出为好看的博客
这两种方式我个人都在使用,第一种是生成自己看的私人笔记等;第二种方式是生成对外展示的博客,下面逐一介绍。
3 通过ox-publish写博客 🔗
我们需要对 ox-publish 做一些基础的配置:
(use-package ox-publish
  :ensure nil
  :commands (org-publish org-publish-all)
  :config
  (setq org-export-global-macros
      '(("timestamp" . "@@html:<span class=\"timestamp\">[$1]</span>@@")))

  ;; sitemap 生成函数
  (defun my/org-sitemap-date-entry-format (entry style project)
    "Format ENTRY in org-publish PROJECT Sitemap format ENTRY ENTRY STYLE format that includes date."
    (let ((filename (org-publish-find-title entry project)))
      (if (= (length filename) 0)
          (format "*%s*" entry)
        (format "{{{timestamp(%s)}}} [[file:%s][%s]]"
                (format-time-string "%Y-%m-%d"
                                    (org-publish-find-date entry project))
                entry
                filename))))

  ;; 设置 org-publish 的项目列表
  (setq org-publish-project-alist
        '(
          ;; 笔记部分
          ("org-notes"
           :base-directory "~/org/"
           :base-extension "org"
           :exclude "\\(tasks\\|test\\|scratch\\|diary\\|capture\\|mail\\|habits\\|resume\\|meetings\\|personal\\|org-beamer-example\\)\\.org\\|test\\|article\\|roam\\|hugo"
           :publishing-directory "~/public_html/"
           :recursive t                 ; include subdirectories if t
           :publishing-function org-html-publish-to-html
           :headline-levels 6
           :auto-preamble t
           :auto-sitemap t
           :sitemap-filename "sitemap.org"
           :sitemap-title "Sitemap"
           :sitemap-format-entry my/org-sitemap-date-entry-format)

          ;; 静态资源部分
          ("org-static"
           :base-directory "~/org/"
           :base-extension "css\\|js\\|png\\|jpg\\|gif\\|pdf\\|mp3\\|ogg\\|swf\\|mov"
           :publishing-directory "~/public_html/"
           :recursive t
           :publishing-function org-publish-attachment)

          ;; 项目集合
          ("org"
           :components ("org-notes" "org-static"))
          ))
  )
这里最重要的两个配置是: sitemap-format-entry 以及 org-publish-project-alist 。前者是生成 sitemap 的方式,后者是定义publish要到哪个文件夹,把哪些org文件进行发布。
我们配置完 ox-publish 后,可以通过两种方式来发布静态站点:
M-x org-publish-all来发布(全部)站点- 按
C-c C-e后,再按P a来发布(全部)站点
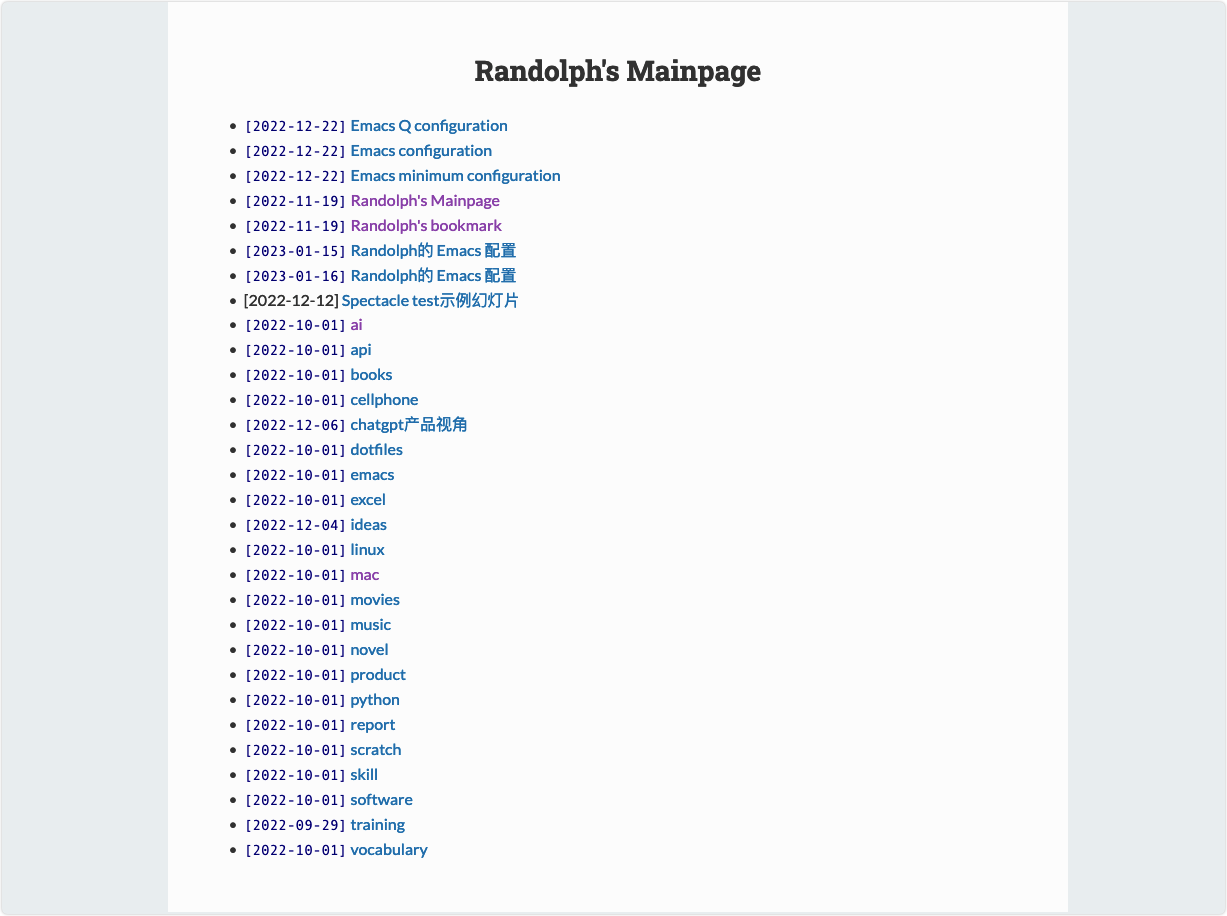
下面这张图片就是我通过 ox-publish 发布后,将自己的所有笔记都发布成静态HTML,然后放到个人nas上,随时随地访问:
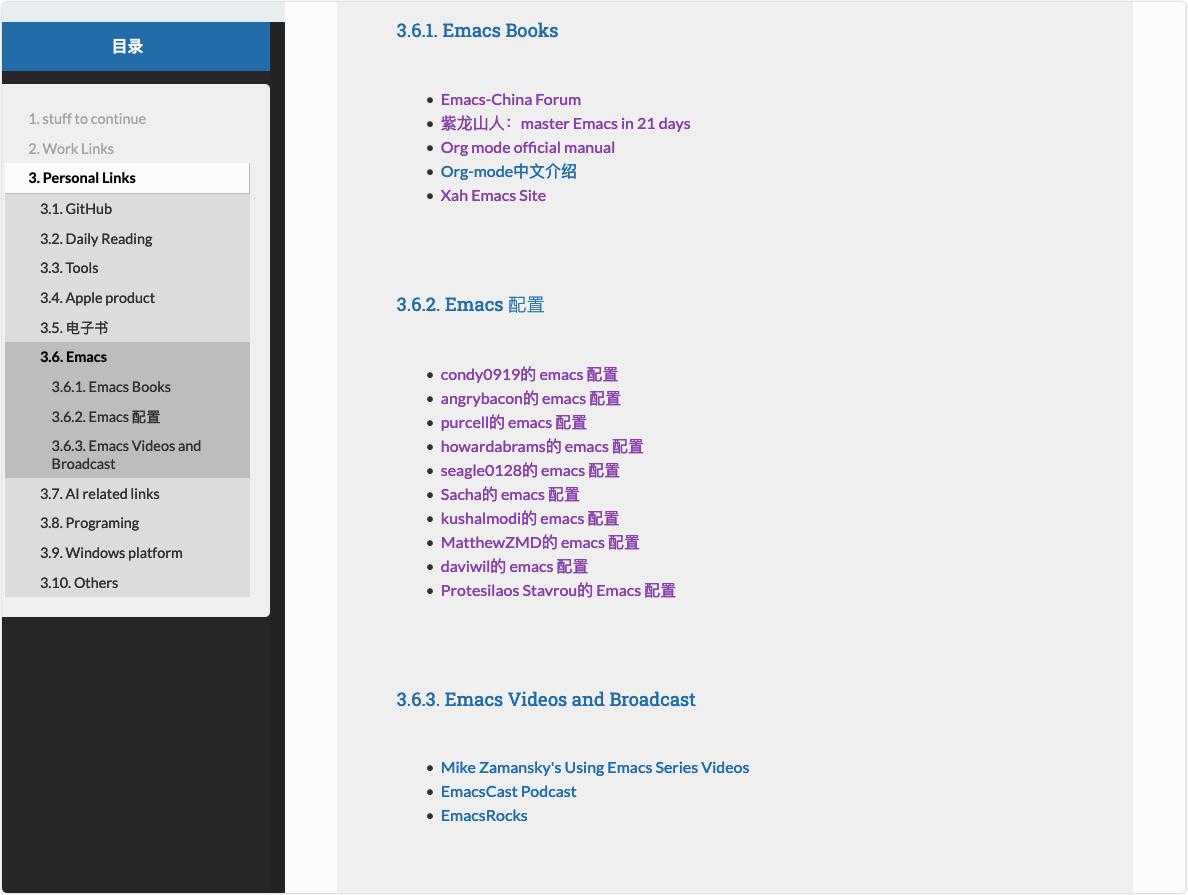
比如,你可以通过这种方式将所有的书签通过Org mode管理起来,然后设置为浏览器的主页:
从个人笔记的角度来说,我非常推荐这种方式,简单粗暴,足够好用,而且所有的静态文件都在本地,你可以自由的放在你想放的地方!
4 通过 ox-hugo 来写博客 🔗
另外一种方式,我们就需要用到 ox-hugo 插件了,简而言之,它可以将org文件导出为 hugo 这个软件需要的Markdown文件,并快速通过 hugo 进行博客的生成和发布。
4.1 安装配置ox-hugo 🔗
首先,我们先安装 hugo :
brew install hugo
然后,我们来安装和配置 ox-hugo 这个插件:
(use-package ox-hugo
  :ensure t
  :config
  (with-eval-after-load 'org-capture
    (defun org-hugo-new-subtree-post-capture-template ()
      "Returns `org-capture' template string for new Hugo post.
See `org-capture-templates' for more information."
      (let* ((title (read-from-minibuffer "Post Title: ")) ; Prompt to enter the post title
             (fname (org-hugo-slug title)))
        (mapconcat #'identity
                   `(
                     ,(concat "* TODO " title)
                     ":PROPERTIES:"
                     ,(concat ":EXPORT_FILE_NAME: " fname)
                     ":END:"
                     "%?\n")          ; Place the cursor here finally
                   "\n")))

    (add-to-list 'org-capture-templates
                 '("h"                ; `org-capture' binding + h
                   "Hugo post"
                   entry
                   ;; It is assumed that below file is present in `org-directory'
                   ;; and that it has a "Blog Ideas" heading. It can even be a
                   ;; symlink pointing to the actual location of capture.org!
                   (file+olp "capture.org" "Notes")
                   (function org-hugo-new-subtree-post-capture-template))))
  )
4.2 如何通过 ox-hugo 导出为博客 🔗
我们安装完 hugo 后,还需要进行一些配置才能使用,下面将逐步配置。
4.2.1 设置一个hugo站点的本地目录 🔗
假设我们将所有的博客都放在了 ~/Blog 这个文件夹:
hugo new site ~/Blog
4.2.2 设置一个主题 🔗
我们以 hugo-theme-mini 这个主题(我的博客用的就是这个主题,非常简洁)为例:
-
克隆这个主题的项目
cd ~/Blog git init git submodule add https://github.com/nodejh/hugo-theme-mini.git themes/mini -
在
hugo站点根目录(即~/Blog)下的config.yaml配置文件中,添加下面这一行配置即可。theme: mini
4.2.3 使用Org mode来写内容 🔗
我们在org文件的文件头,需要添加以下的配置行:
#+HUGO_BASE_DIR: /Users/randolph/Blog
#+HUGO_SECTION: posts
#+HUGO_PUBLISHDATE: 2023-01-22
#+HUGO_CUSTOM_FRONT_MATTER: :hide - header - footer
#+TOC: headlines 2
#+FILETAGS: :Emacs:Org-mode:
解释一下:
- HUGO_BASE_DIR
- 是博客站点根目录
- EXPORT_HUGO_SECTION
- 是博客文件存放的子目录
- HUGO_PUBLISHDATE
- 这篇博客文章的发布日期
- HUGO_CUSTOM_FRONT_MATTER
- 对生成的博客不需要添加 header 和 footer
- TOC
- 生成的目录层级
- FILETAGS
- 这篇博客的标签
然后,就可以通过Org mode愉快的写博客文章了。你需要关心的,只有内容!
4.2.4 导出为 hugo 需要的 Markdown 🔗
ox-hugo 支持以某个标题行来导出,也支持以某个文件来导出,我比较倾向于分文件管理,不太喜欢将所有的博客都放到一个统一的大文件里。
我们按下 C-c C-e 后,选择 H h 就可以将当前的org文件按照设定的路径,导出相应的Markdown文件到 ~/Blog/posts 这个目录下了。值得注意的是, ox-hugo 会自动将静态文件如图片等,也拷贝到 ~/Blog/static/ox-hugo 这个文件夹下,非常方便。

4.2.5 预览 🔗
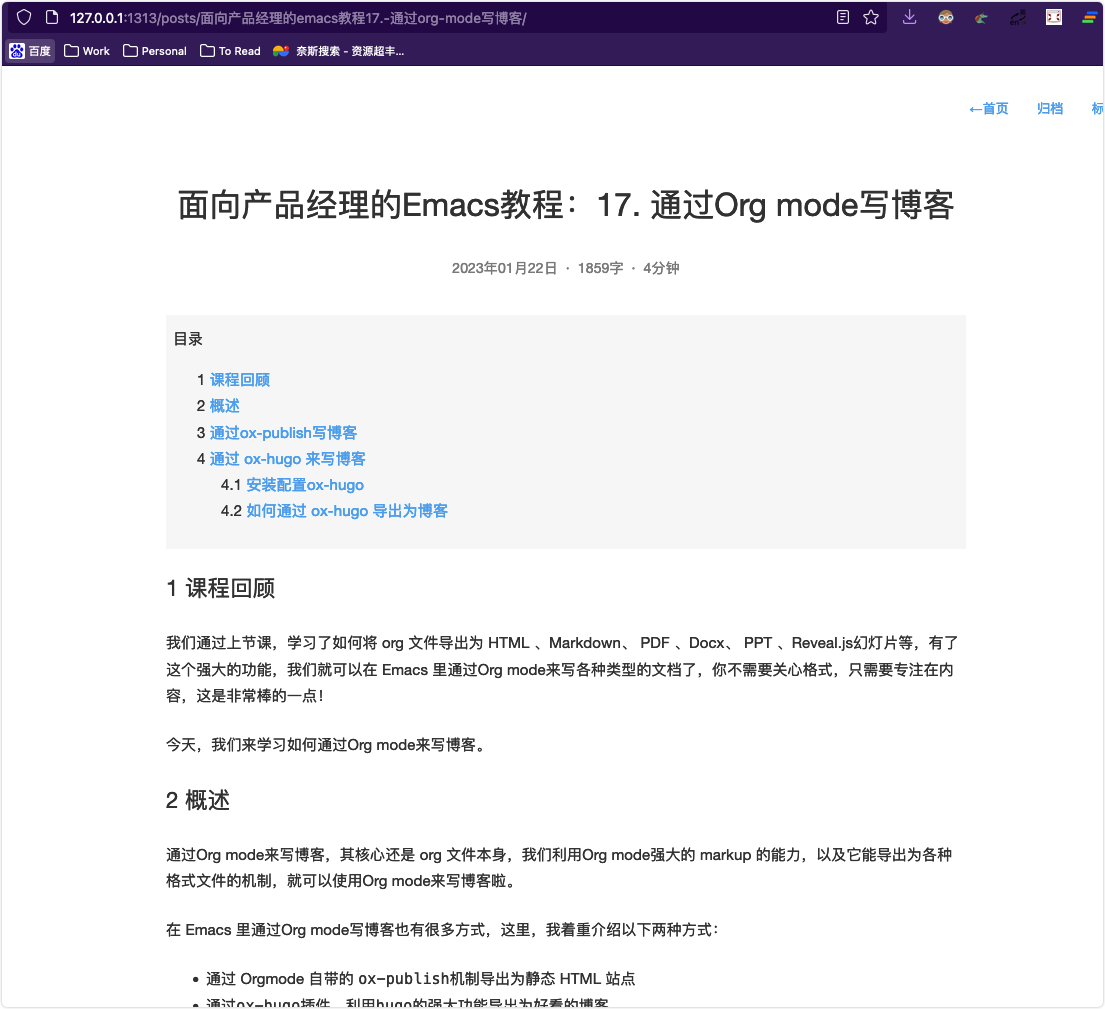
我们可以通过下面这个命令来进行博客文章的预览:
cd ~/Blog && hugo server -D
执行完这个命令后,只需要在浏览器里打开 http://127.0.0.1:1313 就可以预览当前的博客文章了:
4.2.6 生成静态文件并发布 🔗
我们写完了博客文章,可以通过下面这个命令自动生成静态HTML站点文件:
cd ~/Blog && hugo
所有的静态文件会自动生成在 ~/Blog/public 这个文件夹,我们可以根据需要把这个文件夹里的内容部属到远程服务器或Github上了。
如果你使用的是远程服务器,我们还可以通过 rsync 来自动发布并同步到服务器上,具体可以参考 通过rsync自动同步官方文档 。
- 在远程服务器上添加
www-data用户的密码; - 给
www-data用户,在/var/www/目录添加ssh pubkey; - 在服务器上编辑
/etc/ssh/sshd_config文件,添加下面一行:AllowUsers www-data - 执行下面的命令自动生成站点并同步到远程服务器上(假设你的站点内容放在了远程服务器的
/var/www/html/public目录):# 你需要把 remacs.cc 替换成自己的服务器域名 cd ~/Blog && hugo && rsync -avz --delete public/ www-data@remacs.cc:~/html/public/
然后就大功告成啦!!!
5 结语 🔗
经过今天的学习,我们可以通过 Emacs + Org mode 来写自己的博客,来将自己的笔记发布为网页并随时随地访问,通过这些方法加速形成自己的知识体系。
古人云,“温故而知新,可以为师矣”,在为师的过程中,你仍能学到很多东西,真的是学海无涯,活到老学到老啊!
这节课的配置文件的快照见:emacs-config-l17.org
你也可以在 这里 查看最新的配置文件。